Showing posts with label Crafts. Show all posts

Thursday, April 28, 2011

Cherry Blossom Craft for kids


What You Need :-

Construction Paper for the Background
Brown Paint, Crayons, or Markers for the branches
pink tissue paper
Glue ,white glue, and optionally, Elmer's school gel (blue), it squeezes out of the bottle so nicely

How To Make It :-

Protect work surfaces and children, you don't want this paint to get on anything.

Paint a tree with bare branches onto the construction paper with the brown paint. Or, you can draw one with brown crayons or markers.

Set aside to dry.

Tear tissue paper into little pieces and roll to make tiny balls.

Apply dots of glue alongside branches, and place balls in glue.

Gorgeous works of art Cherry blossoming tree is ready!

Tuesday, April 5, 2011

Handmade Birthday Greeting Card


My daughter made this greeting card for her  grandfather.


Card Making Supplies Used :-

    * Light yellow color cardstock
    * Happy Birthday Sticker
    * Foam flowers
    * Golden Glitter pen
    * Glitters
    * Glue
    * Markers
    * Scissors

Thursday, March 24, 2011

Saint Patrick's Day Kid's Craft: Rainbow


Here is an easy rainbow craft for the preschoolers.How to decorate for saint Patrick's day.

Remember ROYGBIV

Red
Orange
Yellow
Green
Blue
Indigo
Violet

Materials Needed:-

White Card stock or white paper
Color pencils/markers/crayons
Scissors
Pencil
Beads/Gold Colored flowers
Glitter
Glue
Cotton

Instructions:-

Take a White card stock.Cut the White card stock into semi circle.
Then draw the arcs of the rainbow.
{This is where having a compass would have been handy!}
Then Paint or colour your rainbow. Let dry.
Decorate the rainbow with glitters or gold colored flowers or You can stamp a clover using the end of a pencil eraser or You can also add beads.
Glue "clouds"or cotton balls onto bottom of rainbow and enjoy!

Tuesday, February 22, 2011

Tissue Paper Flags


These tissue paper hangings can be used indoors and outdoors.The tissue paper flags look very prettier when there is a gentle breeze blowing.They are very easy,inexpensive  and quick to make.Kids enjoy doing this.

Materials Required:-

Tissue Papers
Ribbon/Yarn
Scissors
Glue

Method:-

Fold a piece of tissue paper into four and cut out different patterns.
Unfold and glue top edge over a ribbon or yarn to make a hanging banner.
 
Tip:- Use different colours of tissue papers.


This tissue paper flags  goes to Artsy-Craftsy February

Thursday, February 17, 2011

Tissue Paper Flowers


Tissue paper flowers are just so easy to make that they are a perfect decoration for any gift or event.


Materials Needed:-

Tissue papers
pipe cleaners
scissors


Instructions:-

1) For each flower you will need a stack of 8 sheets of tissue paper. You can use different colors.
2) Take your stack and fold it accordion style, into 1 inch folds. You can make different sized flowers by changing the size of the tissue paper squares and the amount of layers of paper you start with.

Accordion Style Folding

3) Twist a pipe cleaner around the center to keep paper together..
4) Gently pull apart the paper on each flower layer by layer, and fluff the paper upwards to create the flower’s shape.
5) You can try rounding out the edges or cutting diagonally to create pointy edges with your scissors before you form the flowers to create different petal shapes.
Attach your finished flowers onto your gift box or arrange them on tables or in vases.

This tissue paper flowers goes to Artsy-Craftsy February


Sunday, January 30, 2011

Origami Sailboat


Origami is the ancient art of folding paper. Amazing things can be made without cutting or gluing in origami.My daughter enjoyed making these sailboats.

Materials Needed:-

Square colored paper

Instructions:-

1. Get a piece of square paper color side up in a diamond shape.
2. Fold the paper in half diagonally and crease.
3. Fold left and right corners up to the top corner and crease, which should create a small diamond shape.
4. Pull the left and right corners back down to return to the triangle shape.
5. Fold the first layer of paper from the top corner down to the bottom.
6. Fold the left and the right corners back to the top corner along the same fold.
7. Flip paper over to the other side.
8. Pull the single layer of paper from the top corner.
9. Flip paper over.
10. Fold bottom corner up to middle and flatten.
Now you have a sailboat!

Source :- Activitytv.tv

Tuesday, January 25, 2011

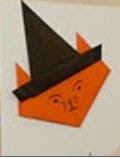
Origami Cat in a Hat


Cat

1) Take a square 6" x 6" piece of paper.
2) Fold and crease it along the diagonal.
3) The fold the left corner on top of the right, and crease the fold.
4) Now unfold the triangle so it lays flat again.  Then fold each corner upwards to make the ears.
5) Now fold the top corner over towards you.
6) Now flip the cat over.
7) Now draw eyes, a nose and whiskers on the front with a marker or pen.


Hat

1) First take a square paper.
2) Now fold your paper in half, below left.  The fold the top corners towards the middle as shown in the above picture. 
3) Crease the folds so that the piece lays almost flat.  The take the bottom edge of the paper and fold it upwards.
4) Flip the piece over and fold the other edge upwards. Origami hat is ready!
5) Stick it with glue on origami cat .
Cat in a Hat is ready!

Related Posts Plugin for WordPress, Blogger...